Warning – technical post ahead…
 My shiny new RaspberryPi came through the door this week, and the first thing I noticed was that it was the first computer I’d ever received where the postman didn’t need to ring the bell to deliver it.
The next thing I discovered, because it came sooner than expected, was that I was missing some of the key bits needed to play with it. A power supply was no problem – I have a selection of those from old phones and things, and I found a USB-to-micro-USB cable. Nor was a network connection tricky – I have about as many ethernet switches as I have rooms in the house.
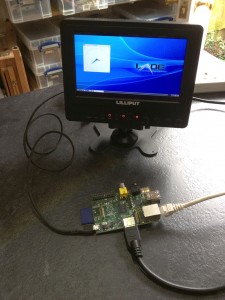
A monitor was a bit more challenging – I have lots of them about, but not with HDMI inputs, and I didn’t have an HDMI-DVI adaptor. But then I remembered that I do have an HDMI monitor – a little 7″ Lilliput – which has proved to be handy on all sorts of occasions.
The next hiccup was an SD card. You need a 2GB or larger one on which to load an image of the standard Debian operating system. I had one of those, or at least I thought I did. But it turned out that my no-name generic 2GB card was in fact something like 1.999GB, so the image didn’t quite fit. And a truncated filesystem is not the best place to start. But once replaced with a Kingston one – thanks, Richard – all was well.
Now, what about a keyboard and mouse?
Well, a keyboard wasn’t a problem, but it didn’t seem to like my mouse. Actually, I think the combined power consumption probably just exceeded the capabilities of my old Blackberry power supply, which only delivers 0.5A.
If you’re just doing text-console stuff, then this isn’t an issue, because it’s easy to log into it over the network from another machine. It prints its IP address just above the login prompt, so you can connect to it using SSH, if you’re on a real computer, or using PuTTY if you’re on Windows.
But suppose you’d like to play with the graphical interface, even though you don’t have a spare keyboard and mouse handy?
Well, fortunately, the Pi uses X Windows, and one of the cunning things about X is that it’s a networked display system, so you can run programs on one machine and display them on another. You can also send keyboard and mouse events from one machine to another, so you can get your desktop machine to send mouse movements and key presses from there. On another Linux box, you can run x2x. On a Mac, there’s Digital Flapjack’s osx2x (If that link is dead, see the note at the end of the post).
These both have the effect of allowing you to move your mouse pointer off the side of the screen and onto your RaspberryPi. If you have a Windows machine, I don’t think there’s a direct equivalent. (Anyone?) So you may need to set up something like Synergy, which should also work fine, but is a different procedure from that listed below. The following requires you to make some changes to the configurations on your RaspberryPi, but not to install any new software on it.
Now, obviously, allowing other machines to interfere with your display over the network is something you normally don’t want to happen! So most machines running X have various permission controls in place, and the RaspberryPi is no exception. I’m assuming here that you’re on a network behind a firewall/router and you can be a bit more relaxed about this for the purposes of experimentation, so we’re going to turn most of them off.
Running startx
Firstly, when you log in to the Pi, you’re normally at the command prompt, and you fire up the graphical environment by typing startx. Only a user logged in at the console is allowed to do that. If you’d like to be able to start it up when you’re logged in through an ssh connection, you need to edit the file /etc/X11/Xwrapper.config, e.g. using:
sudo nano /etc/X11/Xwrapper.config
and change the line that says:
allowed_users=console
to say:
allowed_users=anybody
Then you can type startx when you’re logged in remotely. Or startx &, if you’d like it to run in the background and give you your console back.
Allowing network connections
Secondly, the Pi isn’t normally listening for X events coming over the network, just from the local machine. You can fix that by editing /etc/X11/xinit/xserverrc and finding the line that says:
exec /usr/bin/X -nolisten tcp "$@"
Take out the ‘-nolisten tcp’ bit, so it says
exec /usr/bin/X "$@"
Now it’s a networked display system.
Choosing who’s allowed to connect
There are various complicated, sophisticated and secure ways of enabling only very specific users or machines to connect. If you want to use those, then you need to go away and read about xauth.
I’m going to assume that on your home network you’re happy for anyone who can contact your Pi to send it stuff, so we’ll use the simplest case where we allow everything. You need to run the ‘xhost +‘ command, and you need to do it from within the X environment once it has started up.
The easiest way to do this is to create a script which is run as part of the X startup process: create a new file called, say:
/etc/X11/Xsession.d/80allow_all_connections
It only needs to contain one line:
/usr/bin/xhost +
Now, when the graphical environment starts up, it will allow X connections across the network from any machine behind your firewall. This lets other computers send keyboard and mouse events, but also do much more. The clock in the photo above, for example, is displayed on my Pi, but actually running on my Mac… however, that’s a different story.
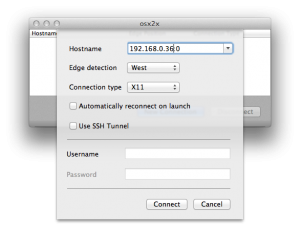
For now, you need to configure x2x, osx2x, or whatever is sending the events to send them to ip_address:0, where ip_address is the address of your Pi. I’m using osx2x, and so I create the connection using the following:
Once that’s done, I can just move the mouse off the west (left-hand) side of my screen and it starts moving the pointer on the RaspberryPi. Keyboard events follow the pointer. (I had to click the mouse once initially to get the connection to wake up.)
Very handy, and it saves on desk space, too!
Update: Michael’s no longer actively maintaining binaries for osx2x, and the older ones you find around may not work on recent versions of OS X. So I’ve compiled a binary for Lion(10.7) and later, which you can find in a ZIP file here. Michael’s source code is on Github, and my fork, from which this is built, is here.


Recent Comments