Tag Archives: home automation

Go, Octopus, Go!

One of the surprising things about Octopus, the UK company from whom we purchase our gas and electricity, is that, despite growing to the point where they handle about a quarter of UK households, they continue to innovate.

For a long time, we’ve been on the ‘Octopus Go’ tariff, which means that for the four hours starting from 00:30 each night, we get electricity at less than one-third of the cost of the rest of the day. We make good use of this, charging our home batteries to the point where, combined with our solar, we very seldom use any normal (i.e. peak-rate) power.

We also charge our car during this time, meaning that our ‘fuel’ costs are about 2p per mile, and one of my favourite statistics is that, since it cost me about £600 to replace our car tyres recently after 30,000 miles, we pay almost exactly the same per mile for fuel as we do for tyre rubber.

All of this may sound very impressive, green and economical… just don’t ask me how much I’ve spent to get to this point! Still, I find it very satisfying.

One of the purposes of this post, by the way, is to remind anyone else also on Octopus Go that, from today, the cheap period has been extended to five hours: from 00:30-05:30. So go and reprogram your cars, car chargers, home batteries or whatever now, before you forget! For those of us who have a standard 7kW home charger, that means 35kWh of cheap-rate power per day, which probably translates into about 100-150 miles, depending on your car.

But Octopus also have some interesting features aimed at balancing the load on the grid during times of peak supply or demand. They’ve tried a few variants, and the availability of any particular one will be rather dependent on your postcode, but here we do quite well, as a result, I think, of generating vast amounts of wind power off the East Anglian coast and not yet having all the cabling that’s needed to distribute it effectively to other parts of the country!

One of these schemes is called ‘Saving Sessions‘, where, at times of peak demand, you can get paid surprisingly high rates per kWh for using less than your normal amount of electricity. At first, I ignored this because we use so little daytime grid power anyway that I thought it would be pointless, until a friend pointed out that even if your usage is normally zero, you can be paid for negative usage; in other words, for exporting to the grid.

“Oh ho!”, thought I, “I can do that!” And so, after a bit of programming, my home automation system notices whenever a Saving Session is active and starts discharging my house battery (and any excess solar) to the grid. These sessions only happen in the winter, and not very frequently, but we still managed to export 40kWh between November and March, earning us about £100. Yes, they really do pay as much as £2.50/kWh for energy we might have bought the night before for 9p. On rare occasions even more.

And finally, there are Octopus Power-Ups. When they think supply is going to exceed demand, they need to absorb it, and so they will let you consume as much as you want for free. Since this is primarily down to the weather forecast predicting strong winds, or lots of sunshine, or both, you don’t get very much notice: typically an email the day before or even on the same day. I just plug the times into my system, and when the moment comes, my car starts charging, my batteries start charging, my hot water starts heating, and so on. It costs me nothing, Octopus probably make more money the more I use, and everyone is happy. (Except my envious friends who don’t live in one of the blessed postcodes!) The main challenge was that I had expended so much effort over many months trying to configure the house to draw as little as possible from the grid, and I now had to set all of the components to do precisely the opposite for a short time and then revert! Still, that’s what home automation is for!

Octopus is a large company now, and like all organisations on such a scale, does have plenty of problems too. They suddenly realised at one point in the past, for example, that they had been billing me for gas but not electricity for nearly a year, and I got a very large bill that month. Also, I had smart meters installed for both gas and electricity, and the gas one has never worked, so I still have to go and read it manually. To be fair, this is a technical problem suffered at a lot of UK households by most providers, who didn’t realise that providing the electricity meter with connectivity and assuming that the gas meter could relay its reports through it using Zigbee wasn’t going to work when, as is often the case, the meters are on opposite side of a brick or stone house filled with competing 2.4GHz signals!)

But, in general, I’m a happy customer, and I hope they continue to explore new and interesting ways to optimise supply and demand. Further innovations will, of course, require me to keep tweaking my code, but, hey, everyone needs a hobby!

My thanks to my pal Gareth Marlow, who has a similar set-up and whose Home Assistant configuration helped me make mine much better! Gareth has also done some great YouTube videos analysing the costs and savings resulting from his home solar/battery system; perhaps the best I’ve seen on that topic for UK enthusiasts. Recommended.
Dumb switches and smart lights?

Almost all of our lights are now ‘smart’: controllable by software, timers, motion sensors etc as well as switches.

If you’ve done this, though, you’ll know there’s a problem: how do you stop people turning things off at the wall, at which point your smart lights become remarkably dumb?

Here’s how I do it:

(Direct link)

House of the Future

Some people may consider my fondness for home automation to be a frivolous pursuit.

Well, let me tell you this…

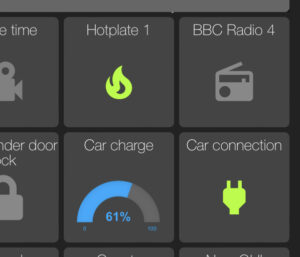
Tonight, as I left the excellent Chinese take-away a few miles from my house, accompanied by this evening’s dinner, I was able to turn on the hotplate in the kitchen at home, so that by the time we got back, the plates were nice and warm and ready to hit the table.

Let nobody say humanity is not reaping the benefits of scientific progress…

A small section of the touch control panel in my kitchen.

Activating Home Automations using NFC tags on iOS

Now that I have a shiny new iPhone, I’ve realised that I can finally start playing with NFC tags, and, in particular, they can do interesting things around the house by making them trigger actions in my Home Assistant system.

I do alread have various Zigbee buttons around the house, and in general these are more convenient, since you can just press them without needing a phone in your hand! There are a couple in the sitting room, for example, which toggle our ‘movie mode’. When movie mode is switched on, the lights in the hall, kitchen and sitting room dim to a low warm glow, any lights that reflect in the TV screen turn off completely, the temperature in the room is raised by a degree or two, and the TV & DVD player switch on. When movie mode is switched off, everything reverts to its previous state. I don’t want to have to pull out a phone to do this; it’s much easier to turn it on and off with a button, or to use voice. “Alexa, it’s movie time!”

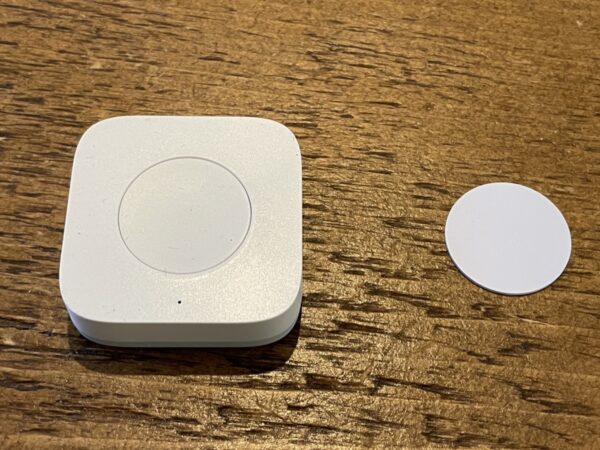
A Xiaomi Zigbee button on the left; one of my NFC tags on the right. The NFC tag is an inch in diameter.

But if you don’t mind pulling out your phone, NFC tags have some key advantages: they’re small, weatherproof, require no battery and can do more things. You can also arrange that they do different things depending on who’s scanning them, so, for example, you could stick one beside your garage door; when you scan it, it unlocks your car, when your spouse scans it, it unlocks theirs, and when anyone else scans it, it does nothing (or perhaps causes your security camera to take a photo of them!)

Some tips

NFC tags each have a fixed unique ID, and for simple interactions you can just arrange that your phone does something when a particular ID is scanned.

But they can also be programmed with custom data using a protocol/format known as NDEF. There are standard ways of storing URLs, phone numbers, etc, much as you would with a QR code. So if you want a tag to take you to a web page, for example, without your phone needing to know anything about the tag in advance, this is a good way to do it.

If you want to experiment with this, then the Simply NFC app is a good place to start. Another good and completely free one is NFC TagWriter by NXP, but for the particular issue of reading things with an iPhone, I had more luck with Simply NFC. And a key thing to know if you’re using small tags is that the NFC reader is at the top of the back of your phone near the camera, and this needs to be within about a centimetre of the tag.

Recent iPhones will read a subset of these tag types in the background (i.e. without you having to run an app). As an example, I’ve just programmed a tag here with my email address (a mailto: link), and if I scan it, a notification pops up offering to take me to the mail app to send a message. I can do this with my iPhone at the home screen, or even the lock screen. More complex email variants, though, (for example, including an email subject line), don’t seem to work without running a special app.

Home Assistant – the simple way, and doing it better

Recent versions of the Home Assistant app know how to program NFC tags, and scan them, and associate them with Home Assistant actions. This is very cool, and gives you lots of information about who’s doing the scanning, etc.

But it has a problem on iOS: Apple doesn’t let an NFC tag perform an action on your phone without your confirmation. So instead of just pulling out your phone and tapping it on the tag, you also need to look for the resulting notification and confirm that you want the action to take place, which spoils the magic a bit. This isn’t an issue, I gather, on Android, but Apple are more cautious about doing things behind your back, especially, I guess, since an NFC tag could be hidden and yet still accidentally scannable.

However, there is one way to allow tags to perform actions on an iPhone without requiring your confirmation each time.

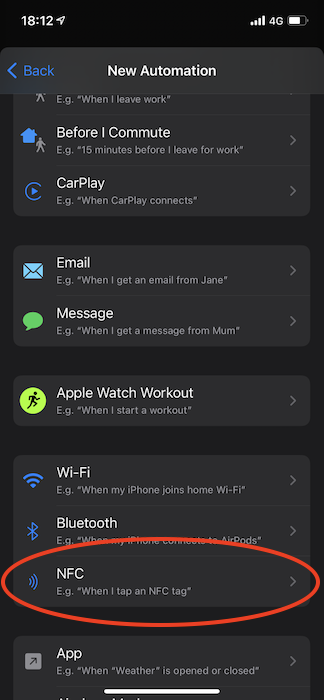
If you create an ‘automation’ on your iPhone using the Shortcuts app (not to be confused with a Home Assistant automation), you can choose to trigger this with an NFC tag.

You don’t need to program the tag: this just uses its ID, I think.

Now, an iPhone automation can do all sorts of things, including requesting a URL. And Home Assistant allows you to create webhooks which can trigger Home Assistant automations in response to a URL being requested.

Setting up a webhook

You can find information on how to create a Home Assistant webhook online, depending on whether you create your automations through the GUI or using YAML. Here’s my simple example called study_toggle, which toggles both ceiling lights in my study:

- alias: Toggle study lights
  trigger:
    - platform: webhook
      webhook_id: study_toggle
  action:
    - service: homeassistant.toggle
      entity_id: light.q_study_back
    - service: homeassistant.toggle
      entity_id: light.q_study_front

I can cause this automation to be run using the URL `/api/webhook/study_toggle’ on my Home Assistant server.

NOTE: It’s important to remember that webhooks don’t require authentication, so if your server is at all accessible to the outside world you should make sure you use more obscure URLs! Please don’t have one called http://homeassistant.me.org/api/webhook/open_garage!

Calling the webhook

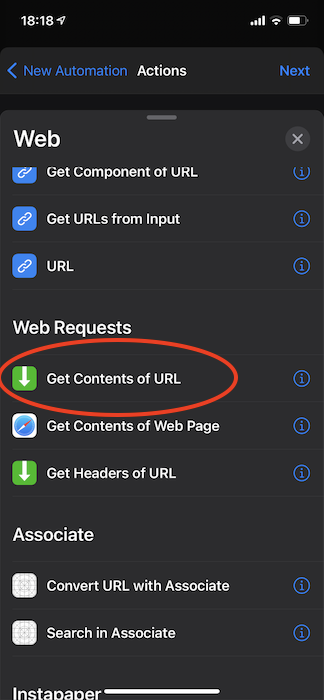
OK, back to the iPhone. Now, your phone will need to make an HTTP POST request to that URL, but fortunately, this is easy to do. When adding an action to your automation, go into the ‘Web’ section and use ‘Get contents of URL’:

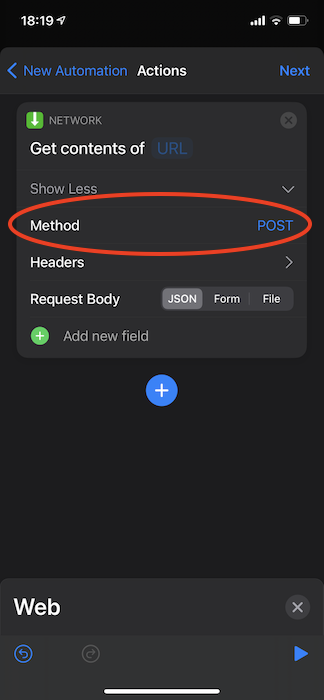
Then you can put in the URL and expand the ‘Show more’ section, which will let you change the HTTP method from GET to POST.

There’s no need to send any data in the request body, but you can add some JSON if you wish to make use of it in Home Assistant.

And that’s basically it! Make sure you turn off the ‘Ask Before Running’ option on the automation.

Now, the first time you scan the tag, it will still ask you for confirmation, but it’ll also give you the option not to be asked in future, at which point you can just tap the tag to run the action. Your phone does need to be unlocked.

Some hints

If you use Nabu Casa’s Home Assistant Cloud, they make it easy to get a long obscure URL which will link to your webhook and which will be accessible from anywhere. (If you set this up on your Mac, you’ll really want your ‘Universal Clipboard‘ enabled so you can copy on the Mac and paste on the phone!)

This is handy if you might want to put the tag somewhere away from your home, e.g. if it’s the last thing you scan before you leave the office to notify your spouse that you’re on the way. I’ve also heard of people sticking tags to their car dashboard which will open or close the garage door.

But if you’re only using the tag to control things when you’re actually at home, you’ll make it a lot more snappy if you keep everything on your local network, don’t go via lots of proxies, and you could even use an IP address to avoid a DNS lookup. So my actual tag to toggle my study lights calls a URL which is something like:

http://192.168.0.30:8123/api/webhook/study_toggle_x65fedwibble

and it’s pretty much instantaneous.

Coronavirus and cavemen

It seems only a few years ago that, when I walked around my house, the lights wouldn’t turn on automatically! For younger readers, I should explain that in the past you actually had to go to a particular place on the wall and press a switch if you wanted to be able to see things!

Can you imagine the inconvenience if, say, you had your hands full at the time? And when you left the room, if you wanted to save power, you’d have to do the same thing again, and then repeat it as you went into the next room. So people had to install switches in all the places they thought they might go in and out of rooms. They had to come up with complex wiring schemes because you might want to turn lights on at the bottom of a staircase and turn them off at the top, when the upstairs and downstairs lights were normally on different electrical circuits!

It’s hard to believe, in this era of easy home automation, that there are some people still living this caveman-like existence, but it’s true, just as there are those who, when they want to listen to the news, turn a physical dial instead of just talking to their smart speaker! Those whose house doesn’t know when they’re in movie-watching mode, so they have to turn the TV on and off with a remote control.

This is, of course, terribly inconvenient for those people who still embrace the ‘retro’ approach to life, but now it has an extra drawback: every one of those switches, buttons, knobs is a hot-spot for potential virus transmission. How are those people meant to protect their family from infection if, carrying in groceries or deliveries from the outside world, they have to press a light switch that everybody else in the family is going to touch later that day? And if, without thinking, they draw the curtains by hand, how many hands will touch the same spot later?

And that’s just home automation. When the lockdown is lifted, just imagine those poor people who have to go back to work in non-automated workplaces! The potential for contagion is terrifying.

But yes, my young friends, that’s what the world really used to be like for most people! Amazing, but true.

Immersive TV and the IOT

One of the things those clever chaps at the BBC R&D are considering is the transmission of extra metadata alongside the programmes, whether on broadcast channels or over the net. This gave me an idea…

We watch TV in a room where I can, from my perch on the sofa, reach the dimmer switch on the wall. This is handy because I don’t think it’s ideal to watch TV in complete darkness, but I do often find that we start with the lighting at a certain level, and then, when we get to the gloomy, sinister scenes, I turn down the ceiling lights to make the low-contrast images more visible and reduce any reflections.

But as we move into an automated-home-internet-of-things type of world, where my dimmer may be accessible via zigbee, Z-wave or similar, perhaps the TV should be able to control the lighting? Screenplays generally specify whether a scene is ‘interior, daytime’ or ‘exterior, night’, for example, so including that in the transmission should be straightforward, and could possibly be automated. Maybe I as a viewer would feel more involved in the action if my lighting conditions matched those of the scene?

The next stage, of course, would be having the central heating automatically turn off when watching a documentary about Shackleton. Perhaps that’s a step too far…

For a more serious immersive experience, I liked the idea the Beeb guys came up with a couple o years ago for ‘surround video‘.

© Copyright Quentin Stafford-Fraser