Category Archives: Apple

Build your house upon the rock

In the last week I’ve walked and cycled many miles around Florence, on the ubiquitous slate-grey stone with which its streets are paved. They cut nice textures into it to make sure it doesn’t become too slippery in adverse weather conditions.

But I have walked on this stone before, in many cities around the world, and in a finely-polished form, because it is used as the flooring material in Apple’s retail stores.

Walter Isaacson’s biography of Steve Jobs describes how this came about:

In 1985, as he was being ousted from his first tour at Apple, he had visited Italy and been impressed by the gray stone of Florence’s sidewalks. In 2002, when he came to the conclusion that the light wood floors in the stores were beginning to look somewhat pedestrian — a concern that it’s hard to imagine bedeviling someone like Microsoft CEO Steve Ballmer — Jobs wanted to use that stone instead. Some of his colleagues pushed to replicate the color and texture using concrete, which would have been ten times cheaper, but Jobs insisted that it had to be authentic.

The gray-blue Pietra Serena sandstone, which has a fine-grained texture, comes from a family-owned quarry, Il Casone, in Firenzuola outside of Florence. “We select only 3% of what comes out of the mountain, because it has to have the right shading and veining and purity,” said Johnson. “Steve felt very strongly that we had to get the color right and it had to be a material with high integrity.” So designers in Florence picked out just the right quarried stone, oversaw cutting it into the proper tiles, and made sure each tile was marked with a sticker to ensure that it was laid out next to its companion tiles. “Knowing that it’s the same stone that Florence uses for its sidewalks assures you that it can stand the test of time,” said Johnson.

Multi-hop networking

Venice, as you may know, is made up of about 100 islands connected by lots of little bridges. That’s roughly how the little network here in my Venice hotel room works, too.

The hotel charges for a wifi connection – only a one-off charge, but it is per-machine, so I only paid for my Macbook to be connected. With recent versions of OS X you can easily create a PAN (a ‘Personal Area Network’) using Bluetooth, so Rose’s laptop and my iPad could then get access by using my Mac as a Bluetooth < -> Wifi gateway. All very cool.

However, I could not get my iPhone to connect that way. I don’t know whether it should work or not – the general expectation is that you’re more likely to use your phone to provide connectivity for your laptop than the other way around! But I wanted a connection for the phone because I needed to download maps and other reference materials to have in my pocket as we explored, and I didn’t want to pay roaming data charges.

And then I realised that, just as my laptop was sharing its wifi connectivity to Rose’s laptop using a Bluetooth PAN, so her machine could then share that connectivity as a wifi network again! And, hey presto, my phone had a network, so I can now download maps to my heart’s content!

What else would one be doing in Venice, after all?…

🙂

Photostream2Folder

Apple users, especially those with iPhones or iPads, will know about the Photo Stream cloud service that makes your recent photos available on all your devices. You can take a photo on your phone, open up your laptop, and find it already available in iPhoto or Aperture.

But what if you don’t use iPhoto or Aperture? (I’ve recently switched to Lightroom and found myself missing this feature). Or you want to do something automatically with every photo you take, like emailing them to Granny?

Well, then you want Laurent Crivello’s Photostream2Folder utility, which polls your stream periodically and simply puts the recent photos in a folder on your disk. Very handy.

Spinning Beachball

A TED speaker’s worst nightmare. Mac users will enjoy this…

Here it is on the TED site (also works for non-Flash users).

A vision of the future? Yes, indeed.

In 1994, Knight Ridder’s Information Design Lab produced a video which was their vision of the future of newspapers: The Tablet Newspaper. Have a look at around 2:20, and see if it looks at all familiar!

(I guess my nearest equivalent in gadget prediction is shown here.)

Let there be Lightroom

In the photography world, there are two big contenders for organising your digital photos – Apple’s Aperture, and Adobe’s Lightroom. There are also apps like iPhoto and Picasa which tend to appeal more to the mass market, not least on the basis of price, and there are some with niche followings – Bibble Pro, for example, now owned by Corel – but in general the majority of professionals or keen amateurs tend to opt either for Aperture or Lightroom. They’ve been made more accessible recently by a bit of a price war: when I purchased Aperture it was over 150 quid, but can now be had on the Mac app store for £54.99. Lightroom 3 is rather more pricey in general, but is available at around £100 for the next couple of weeks, no doubt because version 4 is about to be released.

I’ve been an Aperture user almost since it first came out – it’s a lovely program, and has always done what I needed it to. There are some areas where I think it definitely beats Lightroom – general ease of use, book and calendar printing, geotagging, syncing with iDevices etc – and does so for half the price. I have found very little in Lightroom that Aperture can’t do equally well.

But it does have a couple of limitations. The first is that it’s Mac-only, so if I ever had to move to Windows, I would need to migrate. And the second is that Aperture can, on occasion, be decidedly slow. It keeps improving, and with a bit of careful tweaking (like turning off the Face Recognition functions), can be made run at an acceptable speed on my machines, but it’s worth pointing out that my current Macs are pretty fast ones, and those with more elderly hardware might well find it a trial.

So I’ve been experimenting with Lightroom for a couple of days, and have decided to try switching to it, even though I know that adopting any Adobe product is likely to prove expensive in the long run!

If you search the web, you can find various bits of advice on how to do a migration – there are various people who have gone in either direction and documented the process. You can’t take everything with you. Each app has its own set of effects, filters, and adjustments, and they work not by changing the original files, but by storing in a database the tweaks that you apply and displaying those. Most of the crops, colour balancing, vignettes and exposure changes cannot, therefore, be moved from one to the other, unless you export the tweaked versions as separate files alongside the originals. (One way to do this is to create a Smart Album using the ‘Adjustments: are applied’ filter, and then export TIFFs or JPEGs of anything it contains.)

Any organisational arrangements – folders, books, albums, or smart folders – except those represented directly by filesystem folders, will also not be transferred. But some things can be ported across: metadata such as keywords, copyright information, and geotagging (location information), because there are standard ways of storing such things that both programs respect. It’s quite possible, in fact, to have your master files in one place on the hard disk and open them in either Aperture or Lightroom as the mood takes you, depending on which facilities you need. That way, I think, madness probably lies, unless you’re very careful.

There’s also a slight complication in that geotagging has been very important for me in recent years. Nearly 8000 of my images have accurate latitude and longitude attached, and I don’t want to lose that. But I have Canon RAW files, Panasonic Lumix raw files, and a variety of JPEG vintages, and the EXIF extensions which support GPS information have not historically been equally well supported by all of these, or by the software which interprets them. Sometimes a JPEG can store it, sometimes it can’t.

So, in case anyone else is considering a similar move, this is my plan for the migration.

  1. In Aperture, use keyword tags to mark organisational features that you want to be preserved. Remember, an album called “Bob’s Wedding” won’t come across, but tags will. So go to each album, select all the photos, and tag them. You can then always recreate the organisational structure in LR if wanted, or just search using tags.
  2. Use Aperture’s File > Export > Master… command to copy the original images to a new location. For the metadata option, choose the ‘Create IPTC4XMP Sidecar File’ option. This will create, alongside each image, an XML file with the same name but a .XMP extension, which contains your metadata, including your ratings, keywords, and location info. It largely gets around the fact that different image formats can store different amounts of metadata, so hopefully the important stuff should be preserved. The process can take some time: from some sample experiments, my 22,000 images will take about 11 hours to export. Then, when you import each photo into Lightroom, the sidecar file will automatically be read and associated with the image. Some people, in fact, prefer to keep sidecar files with every image, so that the original file is never touched and the metadata is in an open, human-readable format which can easily be moved around. Lightroom can be told to keep the sidecar file up to date as you make changes, but you do run the risk then of having metadata in the image file, or in the app’s database, or in the sidecar file getting out of sync, and sidecar files are only maintained by Lightroom for RAW formats, not for JPEGs, TIFFS, PSDs or DNGs.
  3. Import the images into Lightroom as DNGs. I chose to convert to the open DNG (Digital Negative) format rather than keep the individual camera-manufacturer’s RAW files. No information is, in theory, lost by this process, and it seems to me more likely that, many years from now, software will be able to read it. In addition, it is good at storing metadata, so should reduce the issue of having multiple copies of that stuff around. It does, however, involve another copy, and a conversion, of the big image files. I imagine this may take really quite a long time! And remember, you will now be creating your third copy of the originals, so make sure you have plenty of disk space. But it can be useful to do it in stages, anyway, because you may want to build up a keyword hierarchy in Lightroom. For example, some of my first photos were tagged with ‘Sydney’. I created a keyword hierarchy which put this under ‘Places > Australia’, and future imports then use that. You can always move things around later, but it may be easiest to do so before the list gets too big.
  4. Delete whichever of the earlier copies of the images you no longer need. (Having made sure you have a good backup, of course.)

Well, that’s the plan, based on lots of experimentation and on recommendations from other sites. Hope it’s useful to someone: I’ll let you know how it goes in due course!

The King is Dead; Long Live the King

This came out a week ago, but I think it’s worth noting for those who missed it. There’s a piece in Business Insider based on an interesting fact first noted by MG Siegler. It’s this:

Apple’s iPhone business is bigger than Microsoft

Note, not Microsoft’s phone business. Not Windows. Not Office. But Microsoft’s entire business. Gosh.

As the article puts it:

The iPhone did not exist five years ago. And now it’s bigger than a company that, 15 years ago, was dragged into court and threatened with forcible break-up because it had amassed an unassailable and unthinkably profitable monopoly.

My name is Ozzie-mandias, king of kings: Look on my works, ye mighty, and despair…

iTunes Match getting stuck…

Warning: geeky Mac post

I had a problem with the iTunes Match process on my Mac – it would get stuck sometimes at the stage of ‘Gathering information about your iTunes library…’. It turned out to be one or two dodgy tracks that were confusing it, but how to find out which they were?

I found the solution on tmksnyder’s post in this thread. He suggested using Activity Monitor, selecting the iTunes process, and clicking the ‘Inspect’ button, which I confess I’d never previously noticed. Here you can find a tab named ‘Open Files and Ports’, which tells you which files (& ports!) the app is currently using. Potentially useful for all sorts of things. (It’s roughly the inverse of the command-line ‘fuser’ utility, which tells which apps have a particular file or mount-point open.)

The window updates dynamically, so if you expand it to a good size and watch it carefully, you can see the filenames of tracks being opened and closed, and, in my case, a couple on which it hiccupped and kept trying to re-open. Deleting and re-downloading those sorted it out.

iTunes Match – upgrading your songs

I’m in the process of upgrading a lot of my earlier AAC/MP3 files to 256kbps AAC. The ones I ripped some years ago tend to be lower quality than that, but it’s been too much hassle to go back to the CDs and update them.

Now, of course, everything is much easier.

I’ve subscribed to iTunes Match, which, for those who have missed it, is a new 22-quid-a-year service from Apple. Basically, it means that if you have a track on any of your machines, you can listen to it on all of them. It looks at what’s in your iTunes Library, and attempts to match it with what they have online. If it finds a match, wherever you got the original from, then you can get a high-quality 256kbps version from the cloud…. straight onto your iPhone or Apple TV, for example.

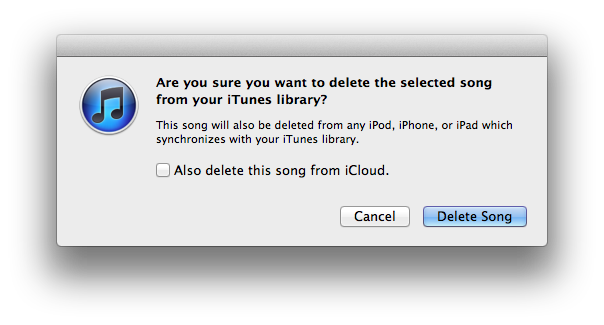
However, as far as I can see, there isn’t a way to make it automatically replace the songs in your iTunes library with the higher-bitrate versions. It needs a little encouragement – basically, once the match process has completed for your library, you need to delete each low-bandwidth track from your local machine and download it again. Don’t worry, it’ll preserve your ratings, playlists etc.

Just select the track(s) in your iTunes and press Option-Backspace. (Cmd-Backspace will also work in the main library, but not in playlists).

You’ll get a prompt:

and note that you’re given the option of deleting it from iCloud; don’t select that!

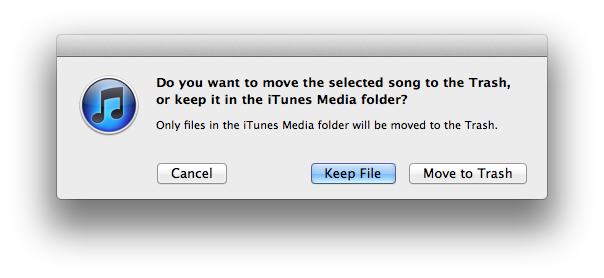
Then you’re asked whether you want to keep the old files or move them to the Trash.

I don’t want too many versions hanging around, so I shift them to the Trash, relying on Time Machine in case something goes wrong.

At this point you should see the entry still in iTunes, but with a little cloud icon indicating that it’s not on your local machine. If you were to start playing it, it would download automatically, but you can also right-click on it and select Download. And there you are, you’ve upgraded your fidelity!

However…

This isn’t too convenient for bulk operations of many tracks at once, and you want to be a bit cautious about tracks for which iTunes didn’t find a match. It’s quite easy to delete them and find that download isn’t an option!

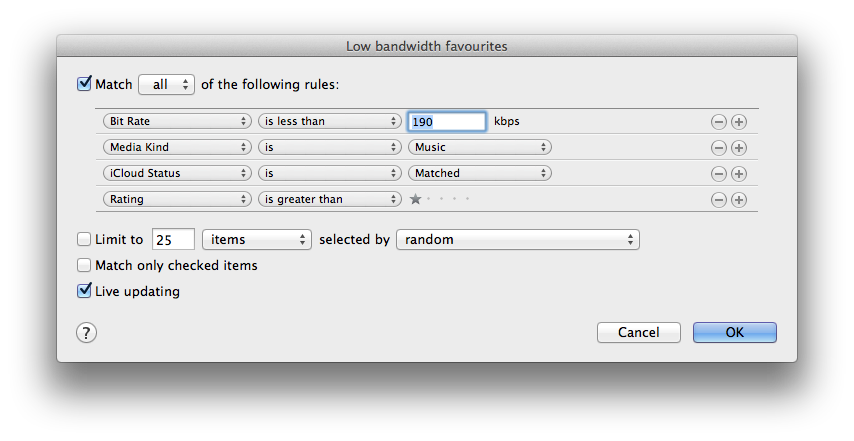
So I created some smart playlists to help with this. I wanted to upgrade my favourite tracks first, so the first one shows music that I’ve rated with more than one star, which is available in the cloud, and which is currently less than 190kbps. I call it ‘Low-bandwidth favourites’:

Low bandwidth favourites

With this, I can browse my highest priorities, select a bunch of them, and delete them easily.

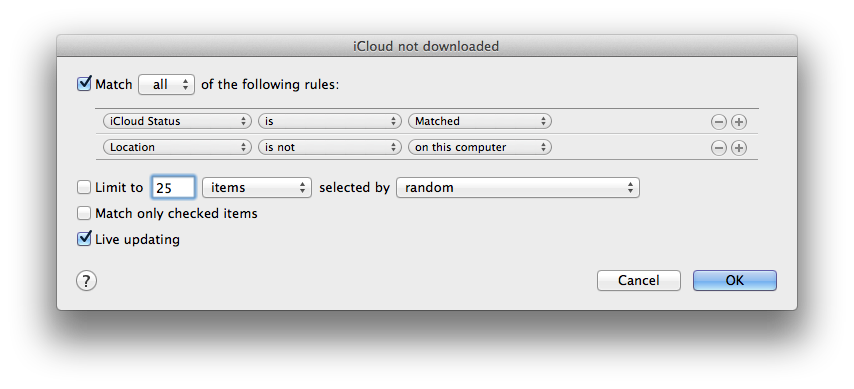
When you do this, iTunes will say, “Aha, I have these in the cloud, where they’re 256kbps”, so after a short pause, they’ll vanish from the less-than-190kbps list. Sometimes this happens before I get a chance to download them, so I have another smart playlist called ‘iCloud not downloaded” where I can go to find them:

iCloud not downloaded rules

Other systems may work better for you – recommendations welcome – but I hope this is a useful starting point!

One thing you should note about iTunes Match, particularly if you are squeamish or have any nefarious purposes in mind: the high-quality AAC files you download will contain your name and Apple ID.

Multiple GnuCash files on Mac OS X

This is one of these ‘just in case you’re Googling for it’ posts. Most readers can probably ignore!

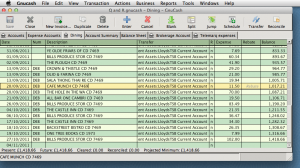
I’ve been experimenting again with GnuCash, the Open Source accounting package that runs on the Mac, Windows, Linux and others. There’s rather a paucity of good accounting packages for Mac users, especially now that the good old MYOB (“Mind Your Own Business”) is no more, but last time I looked at GnuCash it was something that you’d have to be a pretty die-hard Open Source enthusiast to want to use.

Well, it’s come on a long way, and I’ve been merrily importing statements downloaded from my banks and setting it up for both personal and business use. If you’re familiar with double-entry bookkeeping it all works very nicely, and it stores all the data in Gzipped XML files, so I can be pretty confident that I could get it out and into another format if I ever needed too.

Only one hiccup so far – the standard build for the Mac (which no longer requires X11) assumes that you only want one set of accounts (ie. one file) open at one time, and it helpfully closes your current project when you open a new one. But it can be very handy to have your personal account and business account, or more than one business, open at the same time, especially if you’re shifting money between them.

Here’s how to do it:

Instead of running the GnuCash app and using File > Open, start it from the command line, e.g.:

open -a Gnucash -n --args MyBusiness.gnucash
open -a Gnucash -n --args Personal.gnucash

The ‘-n’ means ‘start a new instance even if the app is already running’. Note that some of the preferences etc are still per-user rather than per-file, but assuming you’re not doing anything too complex, this works fine.

You could use Automator to create a handy one-click launcher in your dock for each account to do the same thing. Or, create an Automator application using the ‘Run Shell Script’ action, and specify the script as:

open -a Gnucash -n --args $*

Save the application, and any .ledger files dropped onto it will be opened in their own session.

An Englishman’s Home

I tried out the HDR mode on the iPhone yesterday, deep in the walls of Orford Castle.

I’m still getting used to having a phone that can take such images easily. What was more shocking was that I also snapped quite a few shots with my (much more expensive and less convenient) micro-four-thirds camera, and when I got them home onto the big iMac, I had to look quite hard to tell the difference.

I did notice it when it came to making some adjustments, because the Lumix captures RAW images where the iPhone just does JPEG.

Come on Apple, prove that it’s a real photographer’s phone by offering RAW output too!…

A tale of two iPhones

I know that several people have been buying iPhones recently, but I wonder how many bought two in one day?

I have. Well, to be fair, I did have to take one back. I initially purchased the iPhone 4S from Three. But unfortunately, the Three network has almost no coverage in my home, as I discovered when I got it back there. (The moral of this story is to make sure that you haven’t transferred your previous phone number to your new network until you’ve tested aspects of it that are important to you. Fortunately, I hadn’t.) Here’s the Three coverage map of Cambridge:

You see that little light-coloured hole in the bottom left corner with no coverage? That’s where I live. Which is a bummer, because Three’s bandwidth, customer support, and prices are all really quite good.

However, I’m working at home now, and so being able to receive calls on my mobile while at home is really quite important.

And so I took my phone back into town, sorted out all the refunds and cancellation of contracts, and got another one. I was actually quite amazed that two shops in the centre of Cambridge both had availability of the iPhone I wanted. But sure enough, there was another 64GB 4S in black at Vodafone. And Vodafone, I did know, had good coverage at my home. Their data plans suck. At least, in comparison to Three or some of the other carriers. But, when I got it home, the coverage was fine.

And with Vodafone, there is an interesting twist, which is that if the coverage hadn’t been good, I could have bought a femtocell to improve it. I gather that these are not really very good, but since, if you have a contract, you can get the box from Vodafone for only £20, it seems as if ‘not very good’ might be much better than ‘nothing at all’ which is what some of the other carriers were able to give me.

Anyway, I’m loving this new phone. The camera is excellent, though I’ve only just started playing with it. Here’s a quick low-light shot from my kitchen:

Kitchen

But the Siri voice recognition system also seems to be splendid. In fact, this entire post was dictated into my iPhone, with only very minor corrections, and the insertion of links and images, afterwards. Writing something of this length, using a small phone keyboard, would have been a real pain. I am exceedingly impressed, especially considering the problems I’ve had with speech recognition systems in the past. The only downside is that it will only work when you have a good network signal because it relies on cloud-based services. But otherwise the implementation is great: there is a little microphone key next to the on the keyboard, and so almost anywhere the keyboard pops up, you can decide to dictate rather than type.

And so this has just been dictated into my WordPress blog page and I’m now going to hit save.

© Copyright Quentin Stafford-Fraser