Category Archives: Apple

Taking control of your Mac keyboard

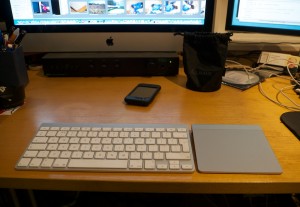
I’m very fond of my little Apple Bluetooth keyboard. Apart from the slightly ridiculous notion of having batteries in a peripheral device which never moves around, it does just what I need: full-size keys, with the cursor keys in a proper configuration, but no numeric keypad to make me stretch my wrist out to unusual angles when reaching for the mouse or trackpad.

However, there is one thing that bugs me. The Ctrl key is not in the bottom left corner where God intended Control keys to be! (Unless you worship the Sun god, in which case you may like your Control keys in the place more commonly used for Caps Lock.) But Sun worshippers, and others who do not consider the Caps Lock key to be evidence of intelligent design, can do something about it: in System Preferences you can remap your Caps Lock to do something useful, like control.

But I don’t think anybody, reaching for the Ctrl key, finds their fingers moving naturally towards the second key from the bottom-left.

Many MacBook Pros have the same layout.

For many Mac users this won’t be an issue, because the Cmd and Option/Alt keys are more important, but if you spend most of your time at the command line or in certain editors, you’ll be hitting the Fn key all the time, and inserting spurious characters into your text.

But today, I found one utility (and only one) that will let me remap the Fn key so it operates as Ctrl: the snappily-named KeyRemap4MacBook.

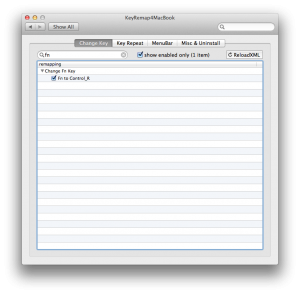
This offers a scary range of options to remap all sorts of things, but hidden in there is the one I needed:

Perfect. This makes the Fn key operate like the right-control key, which means I can do all those Emacs-y things like Ctrl-A to go to the beginning of the line, but interestingly it doesn’t change its effect on the function keys, so I can still use them to do Volume Up & Down etc.

Update: A little later I found that, while the volume keys worked without any further adjustment, some of the other top-row ones didn’t – in particular, the brightness controls. And, in fact, KeyRemap4MacBook comes with a better solution to my problem: there’s a single configuration under the ‘Change Fn Key’ settings that maps the Fn key to be Ctrl, and Alt-Fn to be Fn. Even better.

That was all I wanted, but I dug a little bit further and discovered that, if you’re willing to edit some XML configuration files, you can create your own arbitrary mappings.

As a programmer, I use # much more than I use £, but on the UK Apple keyboard, you have to press Alt-3 to get the #. So I wanted at least to swap with Shift-3, which is £.

Here’s the XML to do it:

<?xml version="1.0"?>
<root>
    <list>
        <item>
            <name>Swap £ and # on UK keyboard</name>
            <identifier>private.swap_pound_and_hash</identifier>
            <autogen>--KeyToKey-- KeyCode::KEY_3, ModifierFlag::SHIFT_L, 
                                        KeyCode::KEY_3, ModifierFlag::OPTION_L</autogen>
            <autogen>--KeyToKey-- KeyCode::KEY_3, ModifierFlag::OPTION_L, 
                                        KeyCode::KEY_3, ModifierFlag::SHIFT_L</autogen>
        </item>
    </list>
</root>

I may eventually put # on another key like, say, ‘§’. Who uses ‘§’ outside the publishing world, anyway?

Or – aha – perhaps that’s the best thing to do with CapsLock…

Update: If you use this keyboard with Linux, you might want to check out Phil Endecott’s page here.

By hook or by crook…

Here’s a way to make yourself feel really stupid: take the SD card out of your camera and slam it happily into the slot in the side of your iMac, only to have it disappear completely. After a short, stunned moment, the realisation slowly sinks in that you have pushed it into the CD/DVD slot instead. How, you wonder, could anyone do something so foolish?

Well, here’s what the side of my 27″ iMac looks like, in a good light, after I have moved my head about 2 ft to the right from my normal sitting position:

I hope you’ll agree that it’s not quite such a daft thing to do. I certainly hope that, and so do the correspondents on this thread on the Apple support forum, where you can read several pages of confessions from people as foolish as me, and some helpful suggestions as to how to get it out again.

Based on one of those hints (Thanks, Cathy1956!) I fished it out with this elegantly-crafted tool:

Getting SD card out of CD/DVD drive

It’s good for people like me to have support groups in times of great need.

Here’s to the crazy ones…

The wires are buzzing with the news that Steve Jobs is resigning from Apple. Everyone knew it had to come, but he will be greatly missed, and the web is gradually filling with tributes of one sort or another.

The thing I have always loved about Apple was that they broke so many rules, and did so with such glorious success.

Conventional business wisdom will tell you, over and over again, that you should focus on your strengths, cast off all else that hinders, and aim to commoditise whatever complements your core business, rather than getting into it yourself. Microsoft don’t make chips, and Intel don’t make operating systems.

Apple, on the other hand, weren’t listening. They gradually grew to sell hardware, accessories, operating systems, applications, for mass markets and niche markets. They even did what many people thought was bound to be a disaster: opening their own retail outlets! But they then turned them into, per square foot, the most valuable retail space in the world. Having covered pretty much everything in conventional computing, they plunged into the notoriously difficult mobile phone market and, well, you know the story. Oh, and by the way, they sell a few books and some music, too.

When you think about it, doesn’t the fact that Ford doesn’t even sell petrol seem, well, a bit unadventurous?

To understand more about the man who made this happen, I recommend this page of quotes from Steve at the WSJ.

Or, for a bit of nostalgia, you can’t do much better than the posters from Apple’s 1997 ‘Think Different’ campaign:

Here’s to the crazy ones. The misfits. The rebels. The troublemakers. The round pegs in the square holes.

The ones who see things differently. They’re not fond of rules. And they have no respect for the status quo. You can quote them, disagree with them, glorify or vilify them.

About the only thing you can’t do is ignore them. Because they change things. They invent. They imagine. They heal. They explore. They create. They inspire. They push the human race forward.

Maybe they have to be crazy.

How else can you stare at an empty canvas and see a work of art? Or sit in silence and hear a song that’s never been written? Or gaze at a red planet and see a laboratory on wheels?

We make tools for these kinds of people.

While some see them as the crazy ones, we see genius. Because the people who are crazy enough to think they can change the world, are the ones who do.

Lion Finder crashing repeatedly

Geeky post to help those who might be Googling for this stuff. To anyone who saw the title and came here hoping to read about an accident-prone safari guide, my apologies.

I know people have mixed experiences with Mac OS X Lion, but for me it’s been almost all good, and I’m very happy with the upgrade.

I did, however, run into a curious problem today on one of my machines, which took a while to sort out. The Finder was crashing and rebooting repeatedly, each time asking me if I wanted to restore the windows it had been displaying before.

I tried all sorts of things: moving stuff off the desktop, deleting the Finder’s preferences file, unmounting drives, booting in safe mode… but in the end it proved to be the Trash that was causing the problem.

I started Terminal (which is always in my Dock, but you can start from Spotlight if you don’t have a Finder running) and did:


sudo rm -rf ~/.Trash

…after which my world came back to normality again. (You’ll need to type your admin password).

Hope that’s useful for someone out there!

The Final Cut is the Deepest

There’s a big storm going on – a lot of very angry people – this week. And there are some rather happy people as well. But it’s quite possible you’ve missed all of this emotional turmoil unless you’re in the world of high-end video editing.

Apple have just released a completely new version of Final Cut Pro, their flagship video-editing suite, which has grown over the last few years to make up around half of the ‘pro’ market. FCP was a game-changer when launched because, at around $1000, it was a tiny fraction of the price of the market-leading product from Avid. This made it the backbone of many a small video-production bureau, yet it was also powerful enough to be used for major Hollywood movies.

In fact it’s a fairly daunting program for new users and can take years to master. Yet, like Photoshop, and maybe even to a greater degree, it repays the time invested. There are those who do spend years mastering it and so acquire skills which keep them and their families fed and clothed. And there is a large industry that provides training, books, software plugins, and other peripheral extras.

I’m a very humble user in comparison – I know my way around it enough to get things done, but I don’t have every keyboard shortcut embedded deep in my muscle memory in the way that the true Jedi of the movie-editing world do. At home I have its lighter-weight but still impressive sibling, Final Cut Express, which was decidedly cheaper, though I’ve often been tempted by the Pro version.

Well, that’s the background. And the big rumpus this week is that the new Final Cut Pro X (pronounced ‘ten’) is a radical change and has upset a lot of people’s… errm… Apple carts. While technically impressive, it looks as different from the old FCP as iMovie did after its rewrite a few years back (which many of us still consider to have been a retrograde step). But for most people, iMovie changes were a matter of personal preference when editing one’s holiday video. With FCP, there are a lot of people who have a lot more riding on it. And it isn’t just cosmetic changes – there are many bits missing which ordinary users might never notice but which are vital for those with complex workflows spanning multiple organisations and software packages. Especially if they still have to support older formats, like tape… And many still do.

David Pogue, who reviewed it in the NYT a few days ago, has followed up with a further post providing a bit more information about the changes to try and calm the madding crowds. “In 10 years of writing Times columns”, he says, “I’ve never encountered anything quite like this.”

The big questions causing concern are whether Apple is abandoning its hard-core FCP supporters by replacing it with a product aimed more at the larger audience of people like me, in which case those years invested in gaining FCP expertise may be lost. And whether some of the older formats, protocols and capabilities which are missing from this first rewrite are now gone for good, or will return in future updates, at which point FCP7 users can upgrade with a sigh of relief…

All very uncertain. But, as I say, there are some happy people around too. I imagine, for example, there are a lot of smiling faces in the marketing groups at Avid. And at Adobe, too: Adobe Premiere, a product which used to fall far short of the competition has, by all accounts, improved dramatically in recent times, and it may well win a lot of new converts in the next few months.

Another happy group will be people like me, who could never quite justify paying more than $1000 for a software package unless their livelihood depended on it.

Final Cut Pro X, however, is available on the Apple store for £179, and nothing before has ever offered that kind of power for that kind of price, which is why I really must stop writing now, because I have to go and start downloading…

Update: If you do decide to go for FCPX, I recommend investing in the excellent tutorial video series from Ripple Training.

Creating HTML signatures for Apple Mail

Apple Mail handles email signatures quite nicely: you can create several of them, for example, and associate particular ones with particular email accounts, so you’re less likely to mismatch signatures and messages.

But, while Mail is very good at displaying HTML content, it doesn’t offer many facilities for editing it. This is as true of signatures as it is of messages. So if you’d like to customise the signature at the bottom of your messages with anything more than a simple change of font size and colour, you’ll have to jump through a few hoops, and be familiar with editing HTML and CSS.

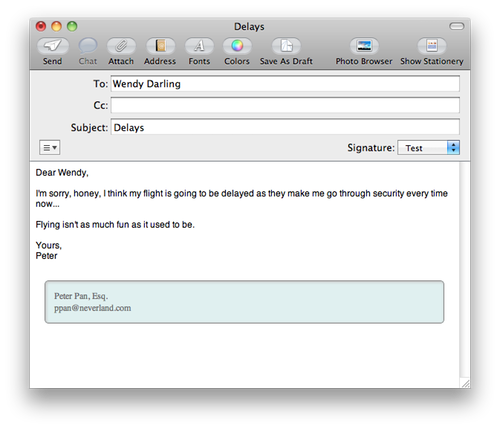
I’m sure that Status-Q readers have sufficient taste to avoid anything too garish, and sufficient sense to know that those annoying legal disclaimers are largely worthless, so let’s imagine you’re just after a small decoration on your messages like this:

Signatures are stored as .webarchive files in your ~/Library/Mail/Signatures folder.
Update: in more recent versions of Mac OS X, they seem to be in ~/Library/Mail/V2/MailData/Signatures.

You can’t edit these directly, but you can view them in Safari, and use Safari to create them.

So here’s how to do it:

  1. Create a new signature in Mail – it can have anything in it – and then quit Mail.
  2. Create some basic HTML in a text editor. I used the following:
  3. Save the HTML file and load it into Safari.
  4. Save it as a Web Archive from Safari.
  5. Find the signature you created earlier in ~/Library/Mail/Signatures, and copy this new webarchive over the top. Signatures have awkward long filenames, so you may want to rename your new file by copying and pasting the sig’s filename, and then drag it into the Signatures folder.
  6. Start up Mail, and you should find your new sig in place. However, Mail normally puts in some extra HTML tags and structure of its own, and I imagine it will be happier with your new signature if you follow the same conventions. So…
  7. Use Mail to make some small edit in the signature text. (e.g. add a space or a full-stop).
  8. Close the Mail Preferences to make sure the signature is saved.

If you want to see what Mail has now done to your signature’s HTML, you can open it in Safari and use View Source, and you can copy this, save it as HTML, edit it to your heart’s content and then convert it again to a webarchive as before.

Remember that email programs vary widely in the HTML they will support or allow in messages, so don’t spend too much time trying to create complex Javascript animations! But you can still do some useful, as well as decorative, things: my normal signature looks like fairly standard contact information, but the postal address is a link to Google maps, the Skype ID is clickable (using a Skype URL), my Twitter and Facebook names will take you to the appropriate pages, and so forth.

Light painting – Making Future Magic

About six years ago I did some brief experiments with ‘light painting’: photography using long exposures where you move the light sources around while the shutter’s open:

2005_02_12-02_00_32

Click the image for a couple more…

My friend Karen has done this on a rather larger scale, for example by running around bits of Thetford Forest in the middle of the night carrying big lights:

01_Forest-coridor_DSC_1355

But she’s also just pointed me at a lovely example of what you can do by bringing this up to date and using iPads as the light source. Making Future Magic is a creation of the Dentsu London agency, and is beautifully done. Worth clicking the full-screen button.

Making Future Magic: iPad light painting from Dentsu London on Vimeo.

Speed up slow console in VirtualBox

This is one of those geeky posts that is here for the benefit of (a) my failing memory – so I can search for it later – and for (b) anyone who happens to Google for the right keywords.

At Camvine, most of our development is done on Linux, but many of us have Macs as our preferred desktop machines. So we regularly install Ubuntu Linux Server as a virtual machine using VirtualBox. We’re not interested in a graphical interface to the VM – the console is fine. Unfortunately, the default video driver that Ubuntu uses when running under VirtualBox is painfully slow, to the extent that we usually minimize the window and SSH into the machine.

Fortunately, the guys on this thread found a solution – thanks everyone!

On the VM, edit /etc/modprobe.d/blacklist-framebuffer.conf and add a line:

blacklist vga16fb

Reboot the VM and speedy scrolling should be yours again.

(Of course, you may still want to ssh in to get more convenient cut & paste, etc., but it’s nice to have a speedy console anyway, and you may not always have network access to the VM.)

Creating and then coping with technology

Michael wrote an interesting account on the Digital Flapjack blog about the creation of his Fingerknots game for the iPad. Recommended.

However good the design of technology, though, some people will still have problems with it – as illustrated by this splendid clip I found on Michael’s other blog.

(I’m feeling very inferior, having only one blog to my name at present).

Know thine email recipient

In an ideal world, you’d create and format your emails, send them off, and the recipient would see just what you meant them to see. Sadly, it’s not an ideal world. For simple messages, obviously, everything works fine, but for more sophisticated emails, it can be less straightforward.

For Mac users, in particular, it’s worth remembering that your recipients may well be using Microsoft Outlook or Outlook Express and so won’t be able to see some of the nice features that Mac users take for granted. A couple of examples:

Attachments in the middle of the email

If you know you’re sending to a Mac user, you can be reasonably sure that their email app will support the standards that allow you to insert and refer to images, documents and other attachments inline as part of the text. Microsoft users, on the other hand, will probably just see these bunched together at the top or bottom of the message. More importantly, if you put any text after them in your message, it may become a text attachment in Outlook. I have seen conversations get very confused when Mac users didn’t realise that PC users had only seen the first half of an email.

Inline PDFs

Since Macs are native speakers of PDF, some graphics apps will naturally output that format and use it, for example, when copying and pasting to other apps. Remember that a PDF, unless it has multiple pages, will embed in an email like any other image on a Mac. On Windows, even if the mail program can display inline images, PDFs will probably appear as attachments, so it’s best not to use them for putting your logo in your signature, for example.

I’m not purely criticising Outlook here; Gmail has some of the same limitations, for example, but Outlook does seem to cause more than its fair share of problems. (See the TNEF issues, for example). Nor am I saying that Apple Mail is perfect – I wish, amongst other things, that it allowed more manipulation of HTML styling. But the Apple Mail/MS Outlook differences are the ones that most people are likely to see most often, so that’s why I’m highlighting them here.

Anyway, Apple users who know they are sending to PC users should therefore probably take advantage of the options under Mail’s ‘Edit > Attachments’ menu, which let you send attachments in a more Windows-friendly way, and force them to be at the end of the message.

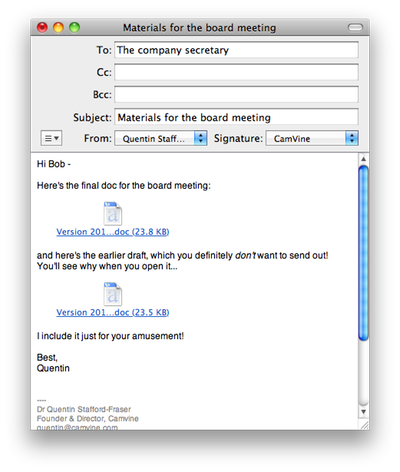
If, on the other hand, you’re using a Mac and you know your recipient is also likely to be using a Mac, then you can take advantage of some of these features and, for example, put explanatory paragraphs around your attachments:
But how, other than through your estimate of the recipient’s, or their organisation’s, general level of street cred, can you guess what kind of a mail program they’re using?

There are one or two things that will give you a clue immediately. If they have mysterious ‘J’ characters in their messages, for example, it’s because Outlook uses a somewhat strange, or at least very dated, method of encoding smileys, which seldom displays correctly elsewhere. For ‘J’, read :-).

But you can almost always get a definite answer by asking your mail app to show you the full headers, or perhaps the raw text, of the email message. (On Apple Mail, go to View > Message > Long Headers.)

Most email programs will insert a header named X-Mailer which will identify the source as being, for example, ‘Microsoft Outlook 14.0’, or ‘Apple Mail (2.1081)’.

If a message doesn’t have that header, then it probably didn’t come from a desktop app, and you may get a clue from other headers that it came from Hotmail, GMail, or a mailing list. The iPad Mail app doesn’t add X-Mailer, but it does identify itself in the Mime-Version, so take a look at the other headers too.

In addition to helping you plan complex email messages, I’ve used this in the past to guess whether somebody is using a Mac, Windows or Linux machine before recommending a piece of software that might not work on their platform.

Old and Creeky?

One of my treasured possessions is my old Creek Audio CAS 4040 amplifier, which I bought as an undergraduate. It was something of a classic for low-budget hi-fi enthusiasts like me when it was launched in the eighties. For £99 it had an excellent sound, and it was from a small and little-known British company, which gave owners a pleasant feeling of being cognoscenti discovering a fine wine at a budget price. You can get a feel for its vintage from the fact that all the audio connections are made via DIN sockets – remember them?

A decade and a half later, when I started delving into DVDs and surround sound, I paid a very great deal more for an all-singing, all-dancing Sony amp, which weighs about the same as a small truck, and which has optical fibre and coax digital inputs, but doesn’t sound as good as the Creek. The Creek gets less use now, though, because it’s in the sitting room and connected to a CD player, and, like most people, that’s not how I listen to most music these days.

Skip forward to the present day, when I’m setting up my new study, have fixed some nice Tannoy speakers to the wall, and am wondering how to connect my iMac to them. I’ve experimented in the past with small computer audio amps from people like Griffin, often powered from USB or Firewire, but have never been really happy with them. I don’t want to go out and buy a shiny, flashy, expensive modern amp – remember, I only need to amplify one single line-level output. Someone, I thought, must make a small monitor amp for this sort of thing, but I couldn’t find one, and certainly not at a reasonable price.

What I really need, I thought one day, is something like the old Creek: that would be perfect! So I headed over to eBay and did a search, and sure enough, manage to find some Creek amps and a few days later was the proud owner of a second CAS 4040. This is the newer Series 3 model, with phono sockets(!), and dates, I think, from about 1990. It sounds great, does just what I wanted, and even fits neatly under the iMac.

And the price I paid on eBay? £99. So my two Creek amps cost the same, despite quarter of a century between purchases! I couldn’t be happier.

Barcode reading on the iPhone

I’ve played with this a bit, and a friend asked me about it this morning so I thought it might be useful to write something up for others.

The more recent iPhones, those with autofocus cameras, can focus close enough to get good images of barcodes and there are several utilities which will recognise them. Some concentrate on 1D ‘traditional’ barcodes, others on the more interesting and capable 2D codes, the most common format being the QR code (shown here).

QR codes have long been popular in Japan, especially on business cards, so Japanese phones have tended to be able to focus at closer ranges than the typical western smartphone, which is only used for photos of friends doing embarrassing things in the pub. Now, though, the rest of the world is gradually catching on and the iPhone is rare in not coming with QR-code reading software included. Fortunately, that’s easy to fix. Here are some of my favourites of the apps I’ve tried:

Optiscan is, in my opinion, the best scanner if you just want to do QR codes. It’s fast and reliable and, when I first got it, was the only one I could easily configure to fill my particular need – I wanted a really low-friction way to scan a QR code containing a URL and view the associated page. Optiscan did that brilliantly – one tap on the screen to scan, and you could set it to open a URL immediately when it recognised it. Nice, simple, well-documented and only £1.19. And that’s the most expensive of these.

RedLaser is the kind of app that high-street stores probably hate. This is designed for traditional 1D product barcodes, scans them well, and then looks up other places you can buy them and tells you the price online. Now, it doesn’t look in very many places, so I wouldn’t suggest it’ll find you the best bargain, but it is a useful reality check before you make that impulse purchase. To be fair to high-street traders, too, it has more than once told me that the difference between their price and Amazon’s was small enough that I was happy to buy the item in-store.

I think the latest version of QuickMark is now my favourite of the apps I’ve tried. (Note that there’s a different version for the iPhone 4). Its big failing is that bits of the UI are rather counter-intuitive and the developer’s website is a mess and hard to navigate. But once you get over that it has several very nice features. Firstly, it will scan a range of different 2D formats including QR Code, Quick Code and Data Matrix. It will also scan 1D barcodes, but, and this is important, you need to configure it for the type of 1D code you’re scanning or it will just sit there failing to recognise anything. If you’re generally scanning standard product codes, go into Settings and make sure you select the EAN/UPC option.

It gets better. There’s now an option for 1D codes to redirect you to a URL based on the code, and you can choose the URL. I configured mine with
http://www.amazon.co.uk/s/?field-keywords=
and sure enough, when I scanned a book it stuck the ISBN number on the end and took me straight to the right place.

And better. There’s a free utility called QuickMark Spot which you can run on your Mac and which will receive barcodes from the phone over wifi, and insert them wherever your cursor happens to be. So you can open a text editor, wander round the house scanning your books and CDs, and come back to find all the barcodes in your file. Very cute, and a better range than, say a dedicated bluetooth scanner.

There are many, many more apps out there, and many more functions to these ones – I haven’t touched, for example, on how some of them can automatically call phone numbers embedded in QR codes, or display barcodes to be scanned by other phones… but this should get you started if you want to explore.

© Copyright Quentin Stafford-Fraser